Setup & Export Guide
Learn how to create and export SVG files that work with Cast’s Custom slide.
SVG Background Standards
Desktop SVGs
- Dimensions: 1080 x 810 pixels
- Aspect Ratio: 4:3 (most important)
- Format: Static or animated SVGs with embedded CSS
Mobile SVGs
- Dimensions: 440 x 836 pixels
- Aspect Ratio: 1:1.9 (most important)
- Format: Static or animated SVGs with embedded CSS
Animation Support
- ✅ CSS animations - Fully supported
- ❌ JavaScript animations - Not supported for security reasons
Personalized SVG Basics
Cast supports special SVG element identifiers that enable dynamic content personalization. By using specific ID naming conventions, you can:
1. Personalize Text Content
Add lc_ prefix to element IDs to replace content with dynamic data:
<!-- In your SVG -->
<text id="lc_customer-name">Placeholder Name</text>
<text id="abc-lc_revenue">$0</text>

<!-- In your dataset -->
{{ customer-name }} = "Acme Corp"
{{ revenue }} = "$125,000"
Result: “Placeholder Name” becomes “Acme Corp” and “$0” becomes “$125,000”
Note: Cast automatically detects IDs with or without prefixes (e.g., both lc_customer-name and abc-lc_customer-name work)
2. Show, Hide, or Dim Elements
Use lc_ or hid_ prefixes to control element visibility per narration:
<!-- In your SVG -->
<text id="abc-lc_metric-label">Q4 Revenue</text>
<g id="something-hid_performance"><rect/></g>
These elements can be controlled in the narration settings to appear, disappear, or dim during playback.
3. Dynamic Attributes
Use special prefixes to control visual properties:
lc_bar_*- Horizontal bar widthlc_column_*- Vertical column heightlc_circle_*- Circular progresslc_color_*- Dynamic colorslc_image_*- Dynamic images- And many more…
View all elements and widgets (with example images) →
Exporting from Figma
To preserve SVG identifiers and text elements when exporting from Figma, follow these critical settings:
Export Settings
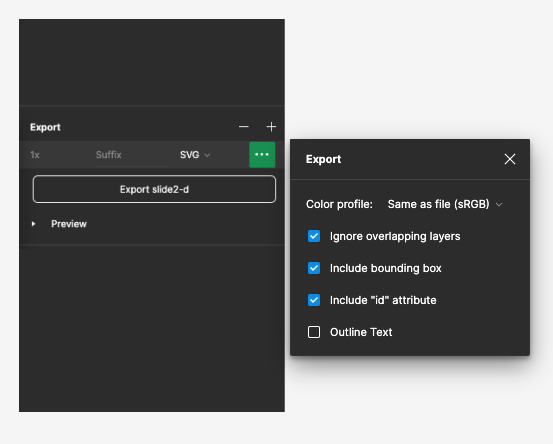
- ✅ Include bounding box - Must be checked
- ✅ Include “id” attribute - Must be checked
- ❌ Outline Text - Must be unchecked (especially for
lc_variables)
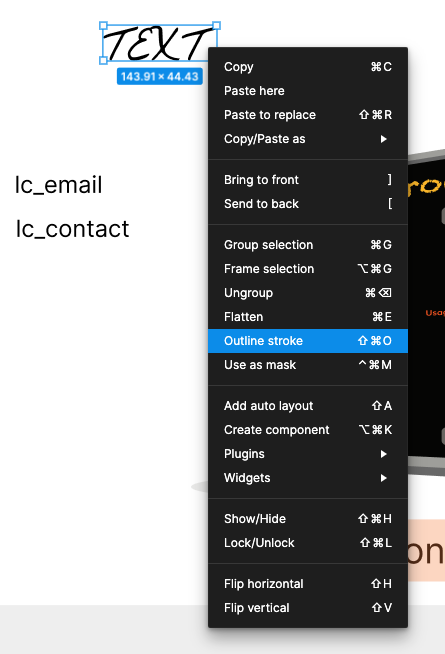
Handling Custom Fonts
If you have text elements with unique fonts that you don’t want to personalize:
- Right-click the text element in Figma
- Select “Outline stroke”
- This converts that specific text to paths while preserving other text elements
Best Practices
- Name layers with
lc_prefix for dynamic content - Use clear, descriptive variable names (e.g.,
lc_customer-name, notlc_cn) - Test export with a simple element before creating complex graphics
- Keep text elements as text (don’t outline) if they need personalization
Animating with SVGator
Create engaging motion graphics by exporting from Figma and animating in SVGator.
Workflow
- Design in Figma - Create your base SVG following the export guidelines above
- Export from Figma - Use proper settings to preserve IDs and text
- Import to SVGator - Upload your SVG to SVGator
- Apply animations - Add desired motion effects
- Export from SVGator - Use the settings below
SVGator Export Settings
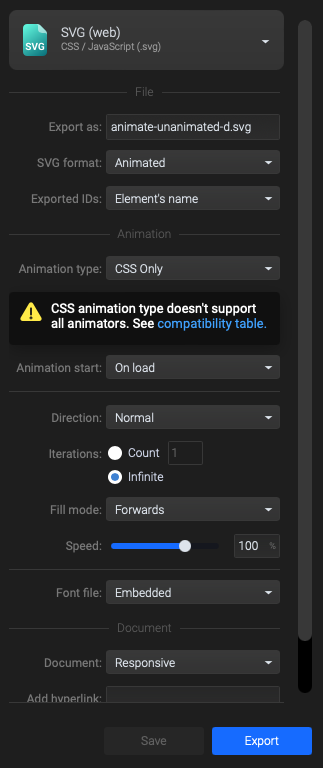
Critical Settings:
- Exported IDs → Change to “Element’s name”
- Animation type → Change to “CSS only”
- JavaScript animations are not supported for security reasons
- Direction → Set to “Normal”, “Reverse”, or “Alternate” as needed
- Iterations → Set to “Infinite” or specify a count
- Preview → Click “Refresh preview” to test your animation
- Save → Click “Save” to preserve your settings
- Export → Download your animated SVG
Important Notes
- ID Prefixes: SVGator typically prepends the filename to IDs
- Example:
lc_revenuebecomesmyfile-lc_revenue - Cast automatically detects both formats, so this works fine
- Example:
- CSS Only: We only support CSS animations due to security requirements
- JavaScript-based animations will not work
- Testing: Always preview your animation in SVGator before exporting
Testing Your SVG
Before uploading to Cast:
- Open in browser - Drag your SVG into Chrome/Firefox to verify it displays
- Check IDs - Open the SVG in a text editor and verify
lc_IDs are present - Test animation - If animated, verify the animation plays in browser
- Check file size - Large SVGs (>1MB) may need optimization
Common Issues
| Issue | Solution |
|---|---|
| Text not updating | Ensure “Outline Text” was unchecked in Figma export |
| IDs missing | Verify “Include id attribute” was checked |
| Animation not playing | Check that animation type is “CSS only” |
| Fonts look wrong | Ensure fonts are web-safe or outlined for decorative text |
| File too large | Optimize SVG using SVGOMG or similar tools |
Next Steps
Now that you know how to create SVGs, learn what you can do with them:
- Custom overview - All lc_* elements with links to dedicated pages
- Quick Reference - Syntax cheat sheet