In-app Delivery
The In-app Delivery tab lets you bring your personalized cast experience right inside your own website or web app. Pick how you want it to appear, copy the snippet, and hand it to whoever maintains your site — that’s it.
Where to find it: open your project and go to Campaigns & Analytics → In-app Delivery.
The page has two sides:
- Left — pick a delivery option and copy the code.
- Right — a live preview so you can see exactly how it will look before you ship it.
Quick start
If you just want to get up and running, follow these four steps:
- Generate an API key from the top-right of this page.
- Pick a delivery option from the dropdown (icon launcher, embed, or developer integration).
- Click Copy to copy the generated code.
- Paste it into your site and replace
<contact_id>with the visitor’s actual contact ID. See Wiring upcontactIdbelow.
API Key
Before you can use any of the delivery options, generate an API Key. This key tells Cast that the embed code on your site is authorised to load your presentations.
- Click Generate the first time, or Regenerate to roll the key. Regenerating immediately replaces the old key, so anywhere you’ve pasted the previous key will need to be updated.
- The key is shown masked for safety. Click Copy to put the full key on your clipboard.
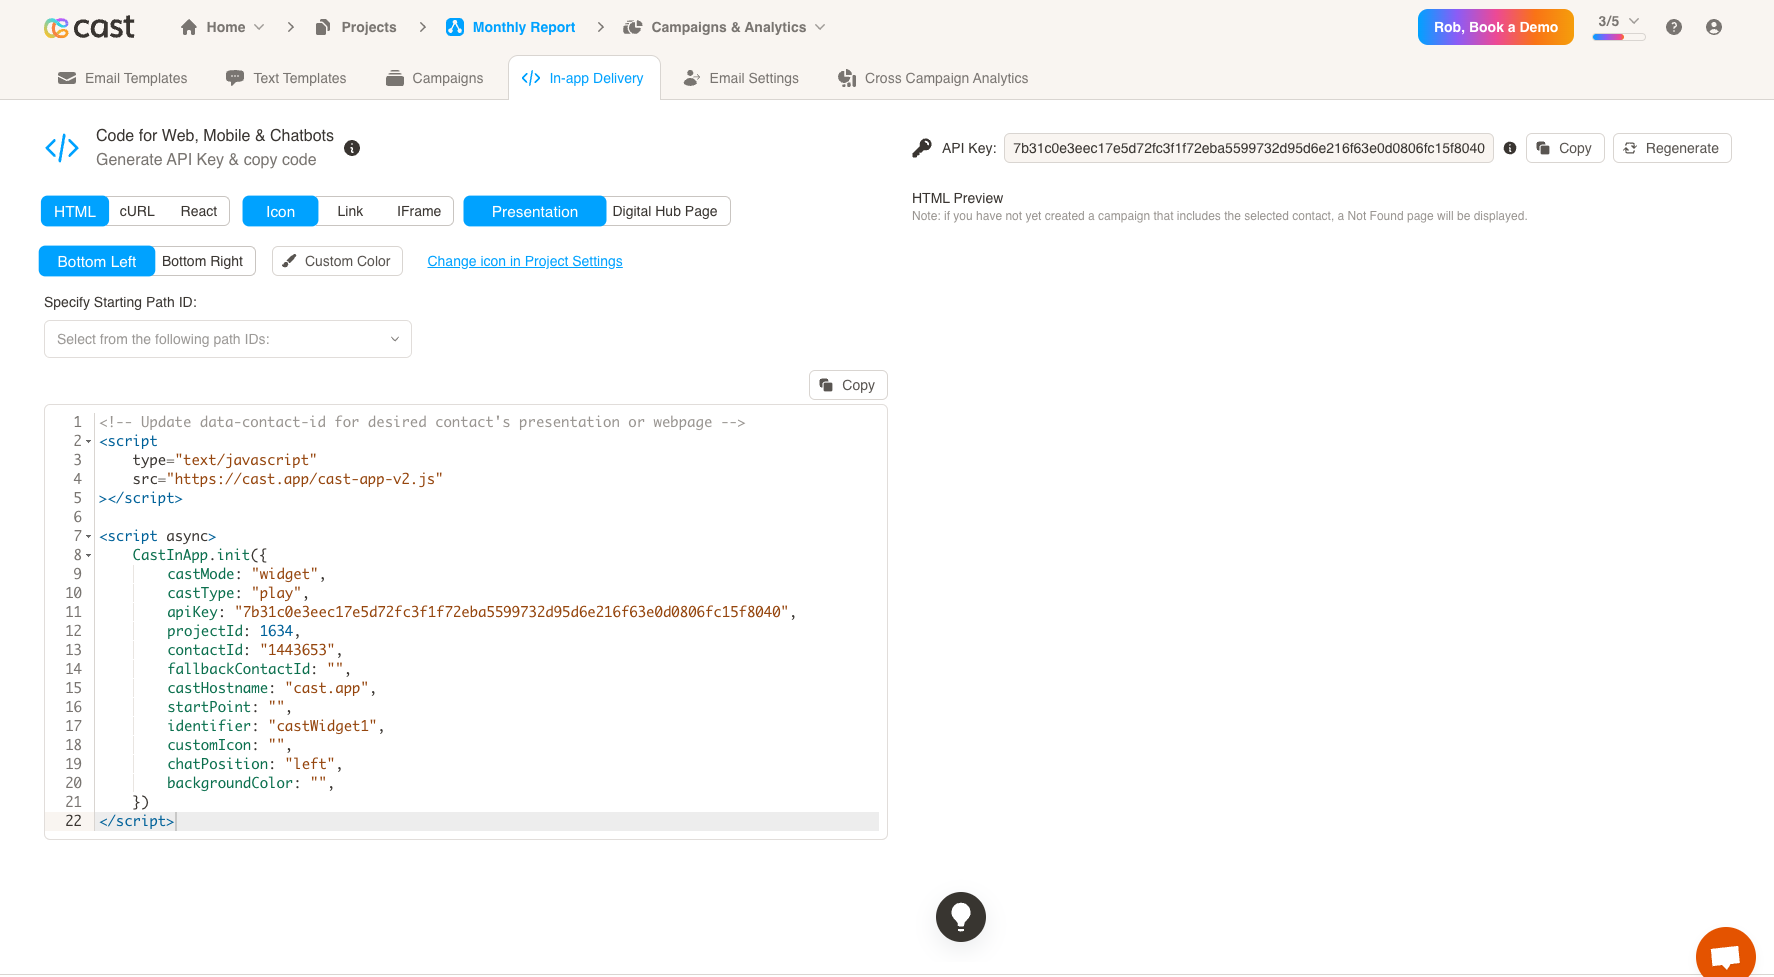
Choosing a delivery option
All delivery options live behind a single dropdown, grouped into three simple categories.
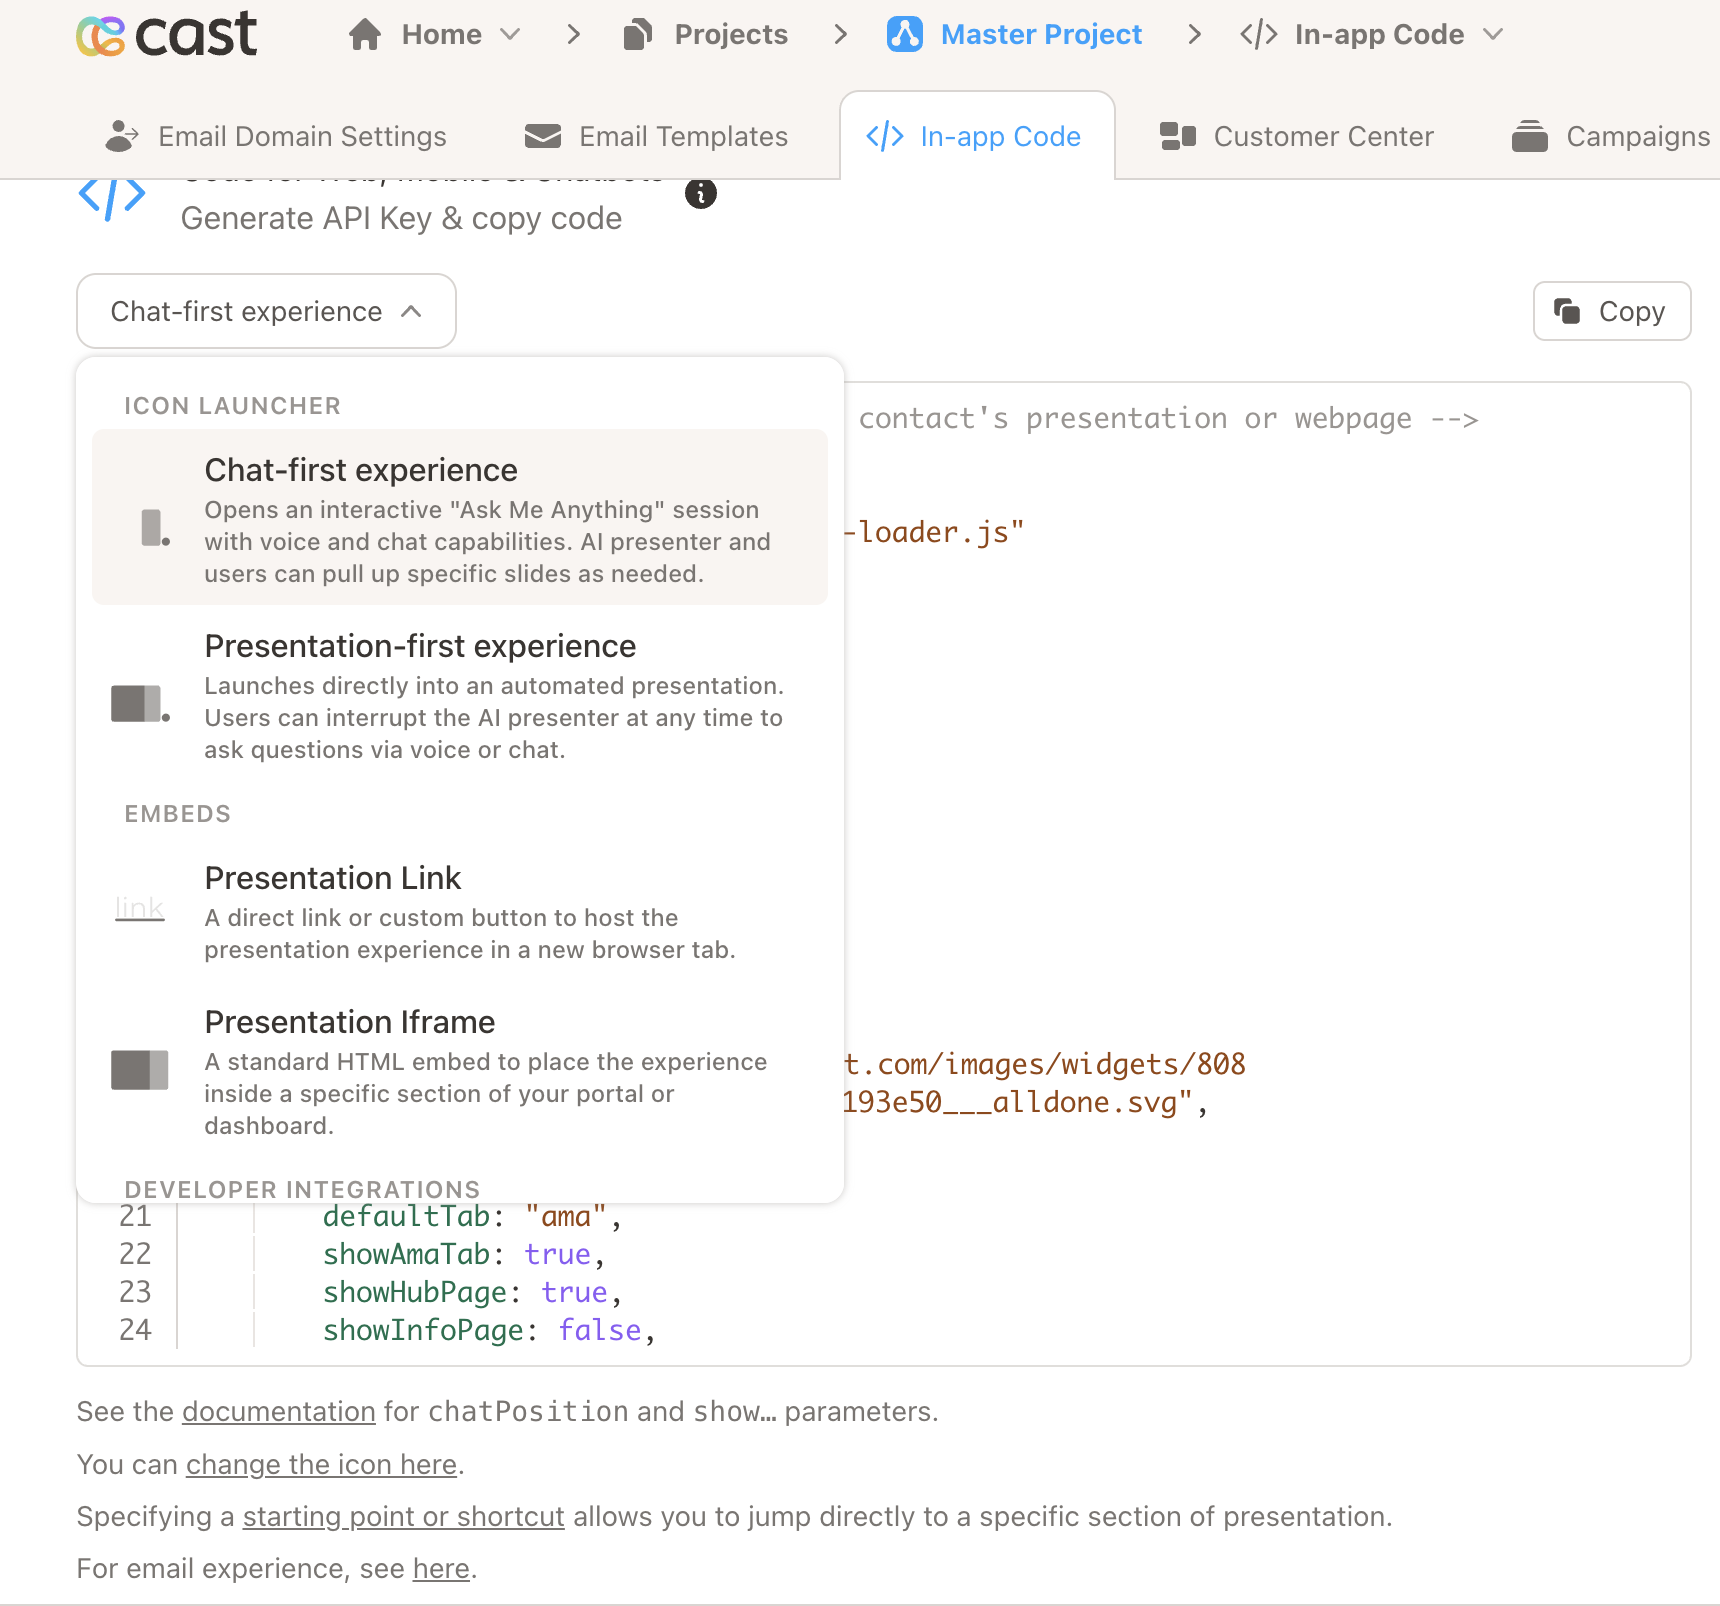
Icon Launcher
A small floating icon that sits on top of your site. When a visitor clicks it, a popup opens with their personalized cast experience.
- Chat-first experience — Opens straight into a conversation. Your visitor can chat or talk to the AI presenter, and slides come up as they’re discussed. Best when you want the conversation to lead.
- Presentation-first experience — Plays the presentation right away. Visitors can interrupt at any point to ask the AI presenter a question. Best when you want the story to lead.
Embeds
Place the experience directly inside your own page, or open it in a new tab.
- Presentation Link — A link or button on your page that opens the personalized presentation in a new tab. Great for emails, dashboards, and call-to-action buttons.
- Presentation Iframe — Embeds the presentation right inside a section of your page. Great for portals, account pages, and customer dashboards.
Developer Integrations
For when your team wants a deeper integration.
- Curl — A simple command your developers can run from a server to generate a personalized link on demand (handy for emails or CRM workflows).
- React — A ready-made example showing how to add Cast to a React app.
The option you pick is remembered, so the next time you open the page it’ll be selected for you.
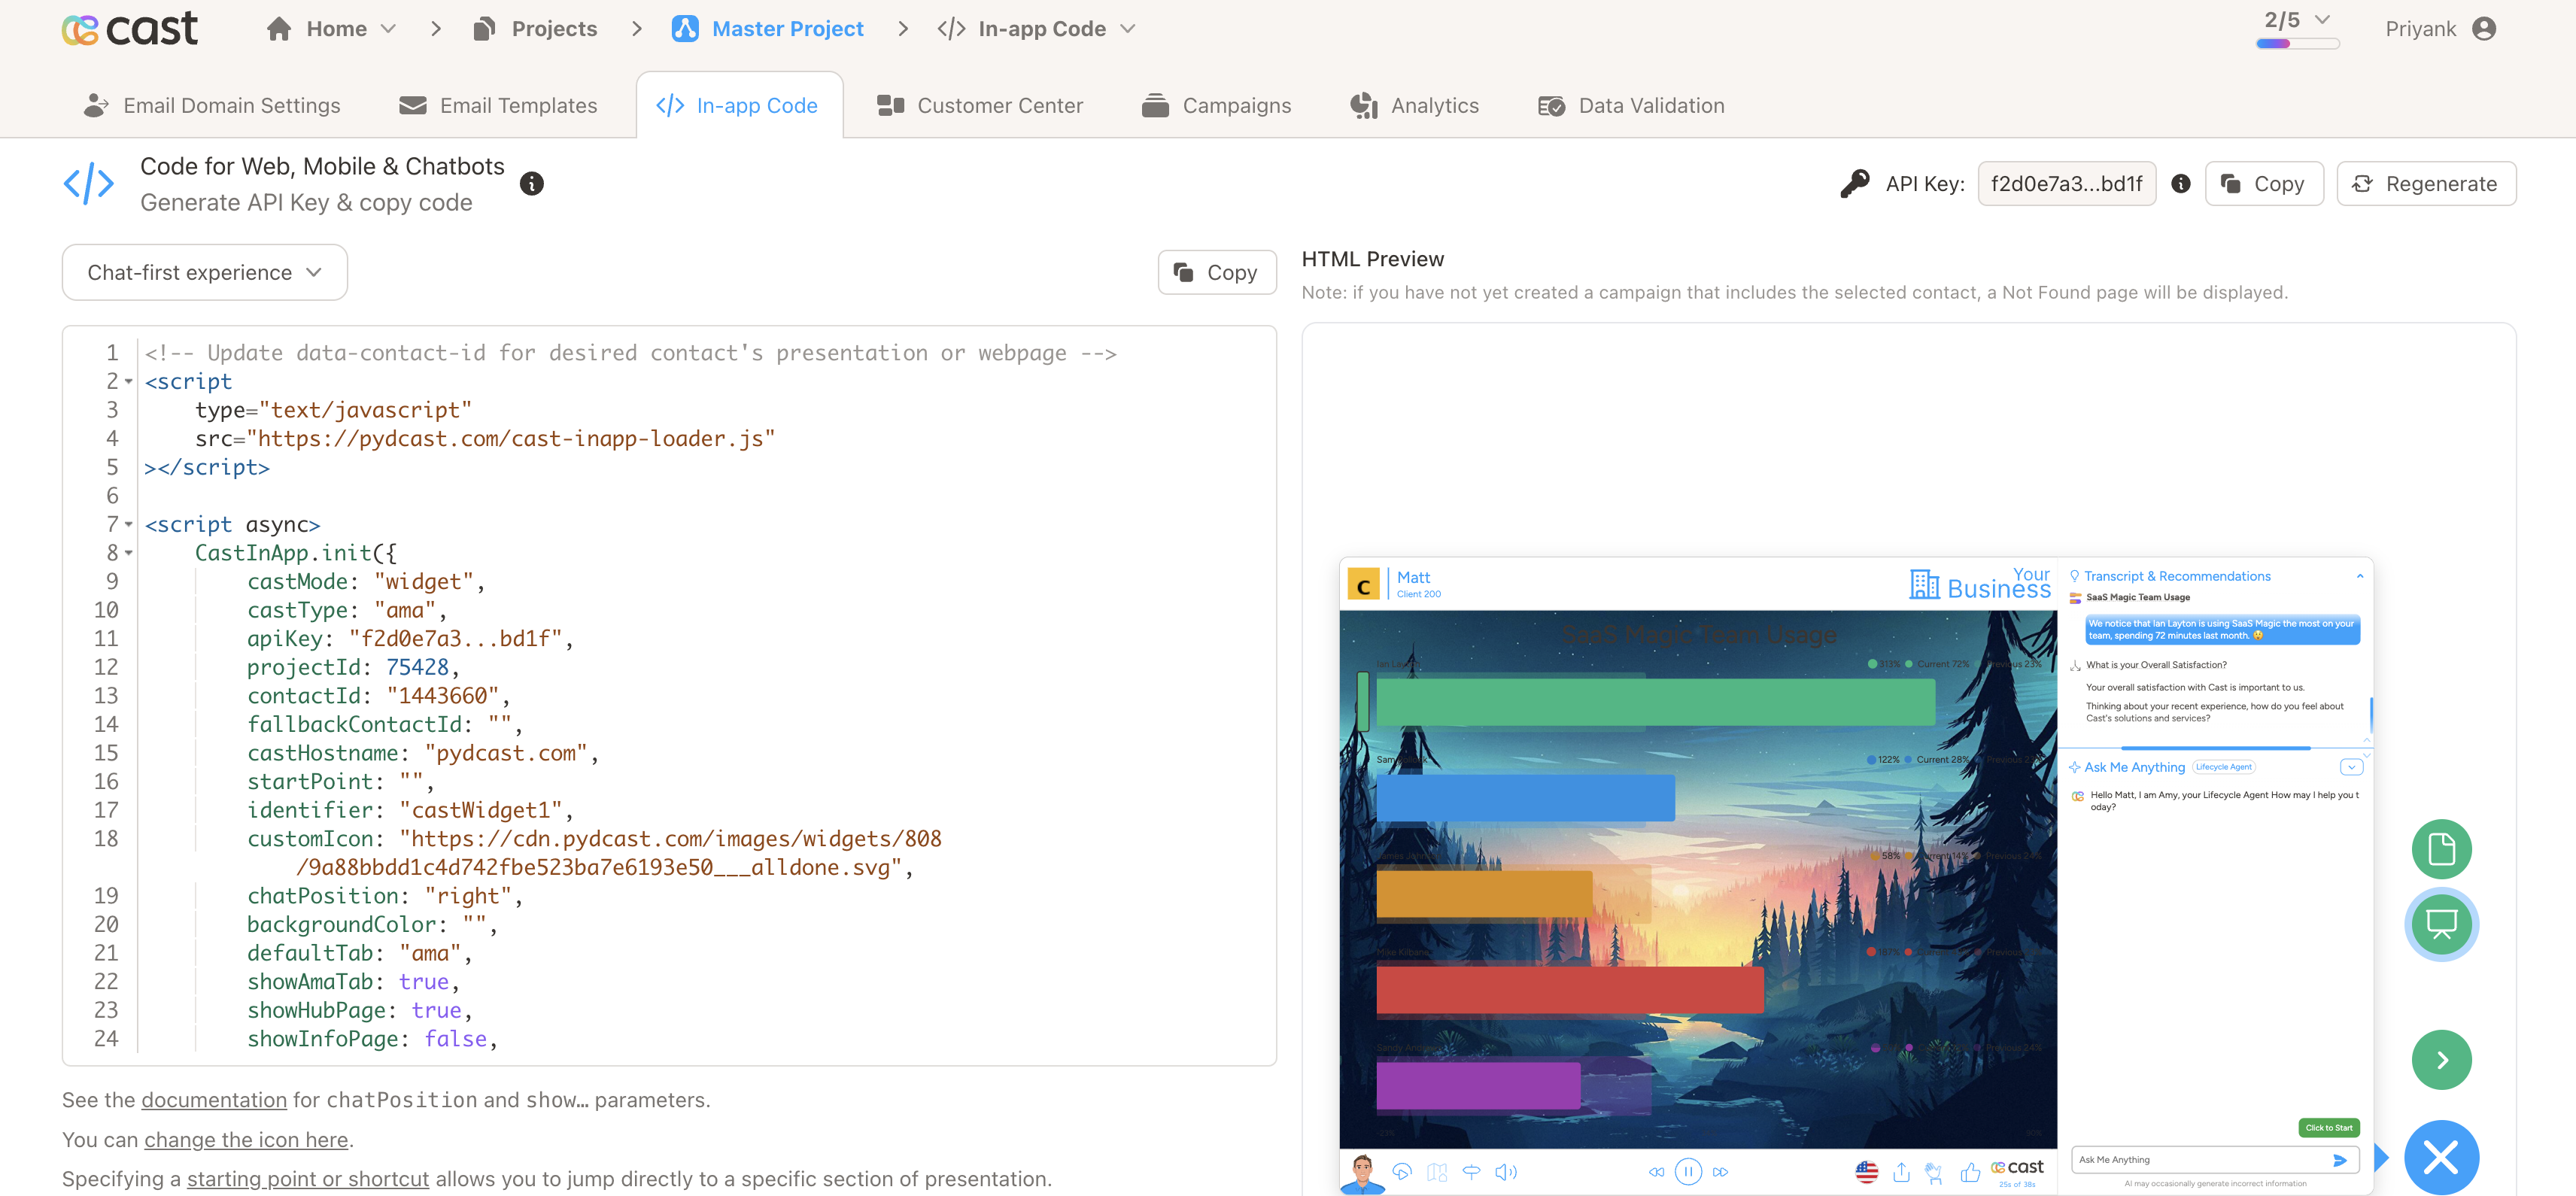
What the snippet looks like
For the icon launcher and embed options, the Copy button gives you a small block of HTML/JavaScript like the one below. This is the exact code you’ll paste into your site.
<!-- Update contactId for the desired contact's presentation or webpage -->
<script
  type="text/javascript"
  src="https://cast.app/cast-inapp-loader.js"
></script>

<script async>
  CastInApp.init({
    castMode: "widget",
    castType: "play",
    apiKey: "your-api-key-here",
    projectId: 12345,
    contactId: "<contact_id>",
    fallbackContactId: "",
    castHostname: "cast.app",
    startPoint: "",
    identifier: "castWidget1",
    customIcon: "",
    chatPosition: "right",
    backgroundColor: "",
    defaultTab: "play",
    showAmaTab: false,
    showHubPage: false,
    showInfoPage: false,
  });
</script>
The exact fields differ between options (Link and Iframe add a small piece of HTML; cURL gives you a single command), but the shape is the same — the fields you’ll most often touch are contactId, fallbackContactId, and startPoint.
Wiring up contactId
Every snippet ships with a placeholder:
contactId: "<contact_id>",
Before going live, you must replace <contact_id> with the actual visitor’s contact ID — otherwise everyone sees the same “Not Found” page.
Where the contact ID comes from
Every contact in your project’s Contacts list (added manually or imported via CSV) has a unique contact ID. That’s the value to pass.
How to swap it in
Render the snippet with the right ID for each visitor. Two common patterns:
- Server-side template — replace
<contact_id>with the logged-in visitor’s contact ID before sending the page to the browser. - JavaScript variable — store the visitor’s contact ID on
window(e.g. from your auth or session) and read it in the snippet.
Before:
contactId: "<contact_id>",
After:
contactId: "987654",
fallbackContactId
Set fallbackContactId to a known-good contact ID (for example, a public demo contact) and Cast will show that one whenever the primary contactId has no matching campaign. Leave it blank to show a “Not Found” page in that case.
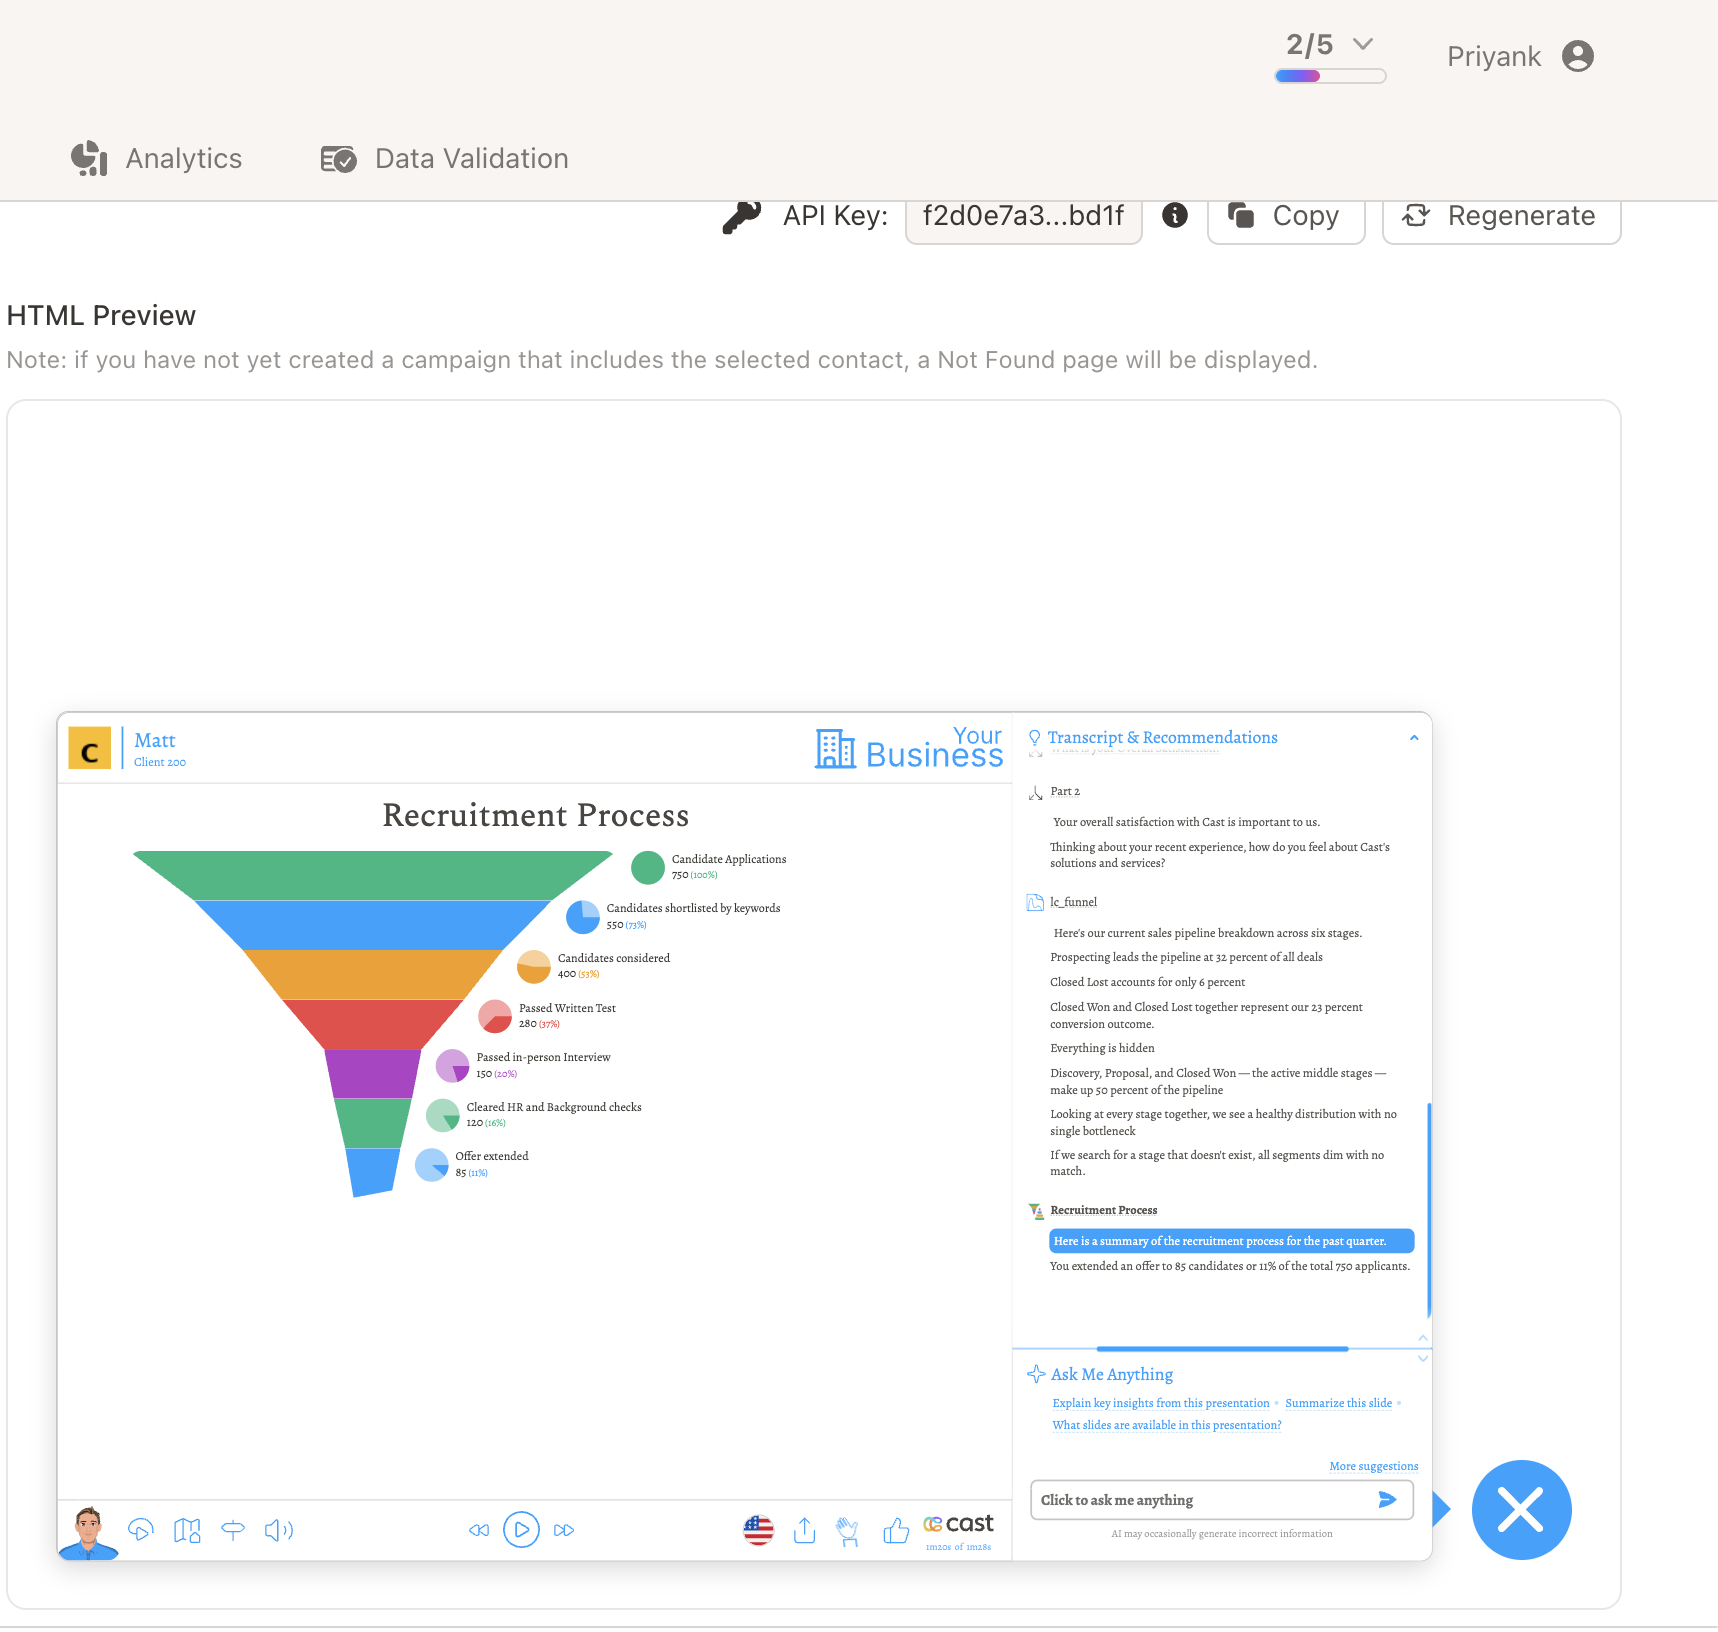
Live preview
For the four visual options (Chat-first, Presentation-first, Presentation Link, Presentation Iframe), the right side of the page shows a live preview so you can see exactly what your visitors will see.
The preview shows up when:
- You’ve generated an API key, and
- You’ve selected a contact from the contact picker.
If the selected contact isn’t part of a published campaign yet, the preview will show a “Not Found” page — that’s normal. Run a campaign for that contact and the preview will fill in.
Customising the icon launcher
The icon image, popup attention message, and other launcher settings are managed in Project Settings → In-App Configuration. The hint under the code on this page links you straight there.
From there you can:
- Upload your own launcher icon (a square 32×32 image; transparent SVG works best).
- Configure the Popup Attention message — the little nudge that grabs a visitor’s attention so they click the icon.
- Decide how often the popup reappears after a visitor dismisses it.
React example
If you picked React, the page links you to a complete working example you can clone or browse:
- Source: https://github.com/cast-corp/delivery-react-example
- Live demo: https://cast-corp.github.io/delivery-react-example
Generating links from your backend (cURL)
If your team would rather generate personalized links server-side — for example to drop them into emails, support tickets, or your CRM — use the permalink endpoint.
- Endpoint:
POST /designer/api/v1/permalink - Header:
Authorization: Bearer <api_key> -
Body:
{ "cast_id": 12345, "contact_id": "987654", "mode": "play" } modevalues:play(automated presentation),ama(Ask Me Anything),information(customer center),page(website page).- Response: a single permalink URL string. Email it to a contact, store it in your CRM, or pass it to your downstream system.
Example:
curl --request POST \
  --url https://cast.app/designer/api/v1/permalink \
  --header 'Authorization: Bearer <api_key>' \
  --data '{ "cast_id": 12345, "contact_id": "987654", "mode": "play" }'
Snippet parameters reference
If your developers want to fine-tune the embed by hand, here’s what each field in the generated snippet means.
Common parameters
| Parameter | Description |
|---|---|
castMode | Which embed style to render: widget, link, or iframe. Set automatically by the option you pick. |
castType | Which experience to load: play (automated presentation), ama (Ask Me Anything), information (customer center), or page (website page). |
apiKey | Your in-app delivery API key. |
projectId | The project (cast) ID this snippet is bound to. |
contactId | The contact whose personalized cast should be shown. Replace <contact_id> with a real ID from your own user/session at runtime. |
fallbackContactId | Contact ID to fall back to if contactId has no matching campaign. Leave blank to disable the fallback. |
castHostname | The Cast host the loader should talk to. |
identifier | The id of the page element the loader binds to (castWidget1, castIframe1, or castLink1 depending on the option). |
startPoint | Optional Navigation Path ID that tells the presentation which section to open into. Leave blank to start at the very beginning. See “Using startPoint” below. |
defaultTab | Which tab is shown first inside the experience: play, ama, information, or page. |
showAmaTab | Whether the AMA tab is visible. |
showHubPage | Whether the customer center / hub page is visible. |
showInfoPage | Whether the information page is visible. |
Icon Launcher only
| Parameter | Description |
|---|---|
customIcon | URL to the custom launcher icon. Filled in automatically from the icon you upload in Project Settings. |
chatPosition | Where the floating launcher sits on the page: left or right. |
backgroundColor | Background colour for the launcher icon. |
Using startPoint
By default, every visitor sees the presentation from the beginning. startPoint lets you jump them straight to a particular Navigation Path — for example, a “Pricing” section, a product-specific deep dive, or a follow-up path you only want returning visitors to see.
How to get a path ID:
- Open your project’s Workflow Builder.
- Click the Navigation Path you want to deep-link into.
- Scroll to Navigation Path ID at the bottom of the path’s settings and click the copy icon.
How to use it:
- Paste the copied ID as the
startPointvalue in the snippet on your site. - You can also vary it per visitor — set
startPointdynamically based on who’s logged in (e.g. their plan, role, or last-viewed topic) so each visitor lands on the most relevant section. - Leave
startPointblank ("") to play the presentation from the beginning. - If you pass an ID that doesn’t exist in the project, the presentation falls back to its normal starting point.
Troubleshooting
A few things to check if something isn’t working as expected:
- Nothing renders, or the placeholder
<contact_id>is still on my page — the placeholder wasn’t replaced with a real contact’s ID. See Wiring upcontactId. - “Not Found” page or empty popup — the contact you’re passing isn’t part of a published campaign yet. Run a campaign for that contact, or set
fallbackContactIdto a contact that does have one. - The launcher icon never appears — check for an ad-blocker or popup blocker, and make sure the snippet’s
<script>tag isn’t placed inside an element withdisplay: noneor hidden by your site’s CSS. - “API key is invalid” — the key was regenerated after you pasted the snippet. Copy the latest key from this page and update the
apiKeyvalue on your site.