
Setup & Export Guide
Learn how to create and export SVG files that work with Cast’s Custom slide.
SVG Background Standards
Section titled “SVG Background Standards”Desktop SVGs
Section titled “Desktop SVGs”- Dimensions: 1080 x 810 pixels
- Aspect Ratio: 4:3 (most important)
- Format: Static or animated SVGs with embedded CSS
Mobile SVGs
Section titled “Mobile SVGs”- Dimensions: 440 x 836 pixels
- Aspect Ratio: 1:1.9 (most important)
- Format: Static or animated SVGs with embedded CSS
Animation Support
Section titled “Animation Support”- ✅ CSS animations - Fully supported
- ❌ JavaScript animations - Not supported for security reasons
Personalized SVG Basics
Section titled “Personalized SVG Basics”Cast supports special SVG element identifiers that enable dynamic content personalization. By using specific ID naming conventions, you can:
1. Personalize Text Content
Section titled “1. Personalize Text Content”Add lc_ prefix to element IDs to replace content with dynamic data:
{% raw %}
<!-- In your SVG --><text id="lc_customer-name">Placeholder Name</text><text id="abc-lc_revenue">$0</text>
<!-- In your dataset -->{{ customer-name }} = "Acme Corp"{{ revenue }} = "$125,000"
{% endraw %}
Result: “Placeholder Name” becomes “Acme Corp” and “$0” becomes “$125,000”
Note: Cast automatically detects IDs with or without prefixes (e.g., both lc_customer-name and abc-lc_customer-name work)
2. Show, Hide, or Dim Elements
Section titled “2. Show, Hide, or Dim Elements”Use lc_ or hid_ prefixes to control element visibility per narration:
{% raw %}
<!-- In your SVG --><text id="abc-lc_metric-label">Q4 Revenue</text><g id="something-hid_performance"><rect/></g>{% endraw %}
These elements can be controlled in the narration settings to appear, disappear, or dim during playback.
3. Dynamic Attributes
Section titled “3. Dynamic Attributes”Use special prefixes to control visual properties:
lc_bar_*- Horizontal bar widthlc_column_*- Vertical column heightlc_circle_*- Circular progresslc_color_*- Dynamic colorslc_image_*- Dynamic images- And many more…
View all elements and widgets (with example images) →
Exporting from Figma
Section titled “Exporting from Figma”To preserve SVG identifiers and text elements when exporting from Figma, follow these critical settings:
Export Settings
Section titled “Export Settings”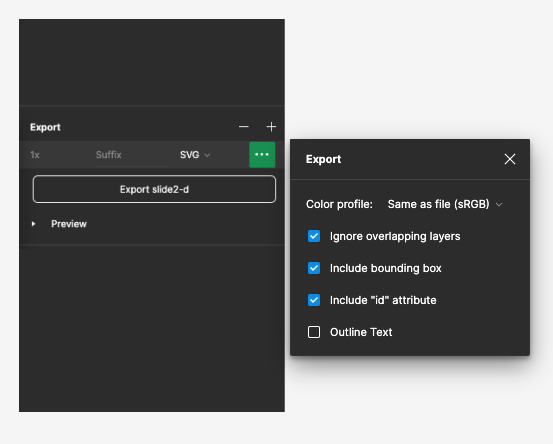
- ✅ Include bounding box - Must be checked
- ✅ Include “id” attribute - Must be checked
- ❌ Outline Text - Must be unchecked (especially for
lc_variables)
Handling Custom Fonts
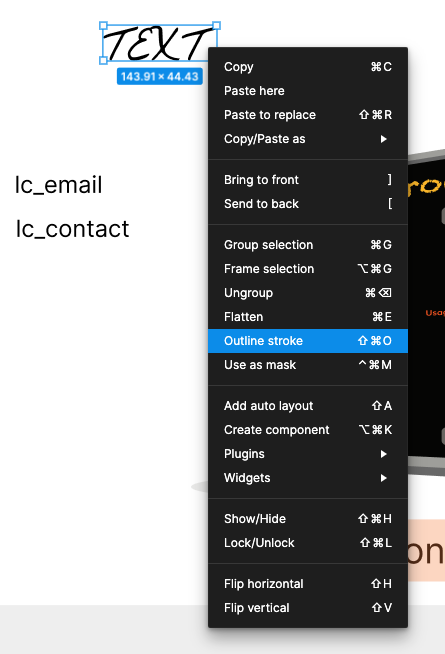
Section titled “Handling Custom Fonts”If you have text elements with unique fonts that you don’t want to personalize:
- Right-click the text element in Figma
- Select “Outline stroke”
- This converts that specific text to paths while preserving other text elements
Best Practices
Section titled “Best Practices”- Name layers with
lc_prefix for dynamic content - Use clear, descriptive variable names (e.g.,
lc_customer-name, notlc_cn) - Test export with a simple element before creating complex graphics
- Keep text elements as text (don’t outline) if they need personalization
Animating with SVGator
Section titled “Animating with SVGator”Create engaging motion graphics by exporting from Figma and animating in SVGator.
Workflow
Section titled “Workflow”- Design in Figma - Create your base SVG following the export guidelines above
- Export from Figma - Use proper settings to preserve IDs and text
- Import to SVGator - Upload your SVG to SVGator
- Apply animations - Add desired motion effects
- Export from SVGator - Use the settings below
SVGator Export Settings
Section titled “SVGator Export Settings”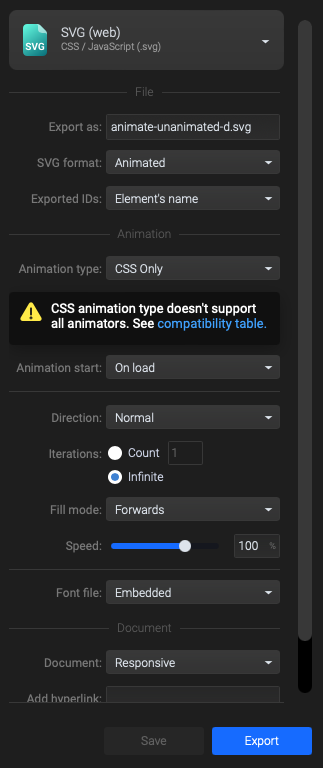
Critical Settings:
- Exported IDs → Change to “Element’s name”
- Animation type → Change to “CSS only”
- JavaScript animations are not supported for security reasons
- Direction → Set to “Normal”, “Reverse”, or “Alternate” as needed
- Iterations → Set to “Infinite” or specify a count
- Preview → Click “Refresh preview” to test your animation
- Save → Click “Save” to preserve your settings
- Export → Download your animated SVG
Important Notes
Section titled “Important Notes”- ID Prefixes: SVGator typically prepends the filename to IDs
- Example:
lc_revenuebecomesmyfile-lc_revenue - Cast automatically detects both formats, so this works fine
- Example:
- CSS Only: We only support CSS animations due to security requirements
- JavaScript-based animations will not work
- Testing: Always preview your animation in SVGator before exporting
Testing Your SVG
Section titled “Testing Your SVG”Before uploading to Cast:
- Open in browser - Drag your SVG into Chrome/Firefox to verify it displays
- Check IDs - Open the SVG in a text editor and verify
lc_IDs are present - Test animation - If animated, verify the animation plays in browser
- Check file size - Large SVGs (>1MB) may need optimization
Common Issues
Section titled “Common Issues”| Issue | Solution |
|---|---|
| Text not updating | Ensure “Outline Text” was unchecked in Figma export |
| IDs missing | Verify “Include id attribute” was checked |
| Animation not playing | Check that animation type is “CSS only” |
| Fonts look wrong | Ensure fonts are web-safe or outlined for decorative text |
| File too large | Optimize SVG using SVGOMG or similar tools |
Next Steps
Section titled “Next Steps”Now that you know how to create SVGs, learn what you can do with them:
- Custom overview - All lc_* elements with links to dedicated pages
- Quick Reference - Syntax cheat sheet